Categories
Interior Painting

Wainscoting Ideas Toronto

Wainscoting is the special technique used for decorating the lower parts of your interior walls. It has gained popularity from the 16th century as it helped keep put cold and stave off moisture-related damages. This technique is primarily used to add beauty to interior spacing in modern times. Wainscoting can be either pre-made or custom-built and made from various materials. If you consider decorating your house interior with wainscoting, read on to know the most interesting wall panel ideas for your interiors.

Some Of The Beautiful Wainscoting Ideas For Homes

1. Beautiful Bead Board

Adding bead boards is one of the ways to give a stylish edge to your wainscoting. A series of narrow wooden planks are used in beadboards to add visual interest to wainscoting, for your wainscoting detailed with coatings to give extra beauty to rooms and interiors.

2. Raised Panels To Add Elegance

The panels used in wainscoting are divided by thin vertical strips and then finished with an upper horizontal rail of molding to give a formal look to living rooms, guest rooms, and dining rooms. The raised panels give depth to the rooms and simultaneously maintain a crisp and clean aura.

3. Creating Clean Lines With Board and Batten

Alternative wide or MDF panels are used as narrow wooden strips between upper and lower horizontal rails of molding. The panels blend beautifully between traditional and modern elements in the transitional spaces, kitchens, and other rooms. The idea is inspired by world-inspired flax board-and-batten wainscoting to warm your rooms and have a modern appearance.

4. Selecting Soft Neutrals

Always ensure to choose a quality wall painting or wainscoting style paint so that the room’s space is not overlooked. While soft neutrals are selected, white panels and low-key cream-colored walls serve as an elegant backdrop for your modernized room with a beautiful glitzy chandelier. Fresh wainscoting hues like white and cream give an option for adding more design elements for your traditional or modern rooms.

5. Using Beautiful Wallpaper

One of the best wainscoting ideas for your house is lively wallpaper for interiors. Embrace your bold eye for design by pairing lively wallpaper with a colorful, wainscoted base. The combination of different wallpapers gives your dining room a rich look and a good atmosphere.

6. Creating A Contrast

Using black and white cannot always be beautiful for your interiors. Black wainscoting painted on Benjamin Moore’s contrasting colors help in picking up the black ascent and gives whimsical illustrations for interiors.

7. Bold Ideas

If you feel that your reading room, hallways, or other rooms are not getting the attention they deserve, then it is time to use eye-popping colors for functional spaces of your house. Wainscoting colors like electric blue or magenta red can inject energy into your rooms and give a special look for interiors.

8. Brighten And White Colors

If you are a lover of black color but fear that interiors might become dull, there is a beautiful idea brightening your rooms. The whiteboard-and-batten wainscoting in this multipurpose room shifts guests’ gaze to the painted accent and highlights the ceilings. Painting the wainscoting below with white color will help to brighten a room and make rooms cozier.

9. Matching The Wall Color

Choosing the color for wainscoting with your wall is often overlooked in achieving visual cohesion. Distinctive abstract wall art, colors for living rooms matching walls, and contemporary colors help maintain a unified look for walls and raised panels.

10. Colors For Cabinets

If your house has many cabinets, then consider installing wainscoting on the other walls to avoid the lopsided look and achieve a more cohesive and modern look for rooms. One of the ideas can be installing white recessed panels against blue-gray dining rooms with custom white color for cabinets to have a balanced effect.

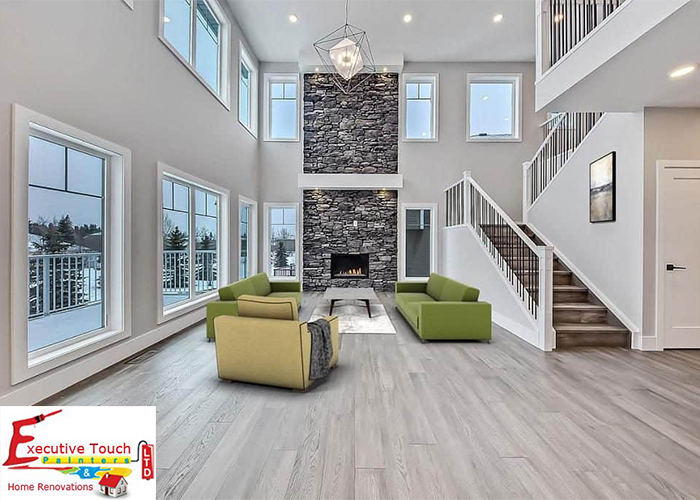
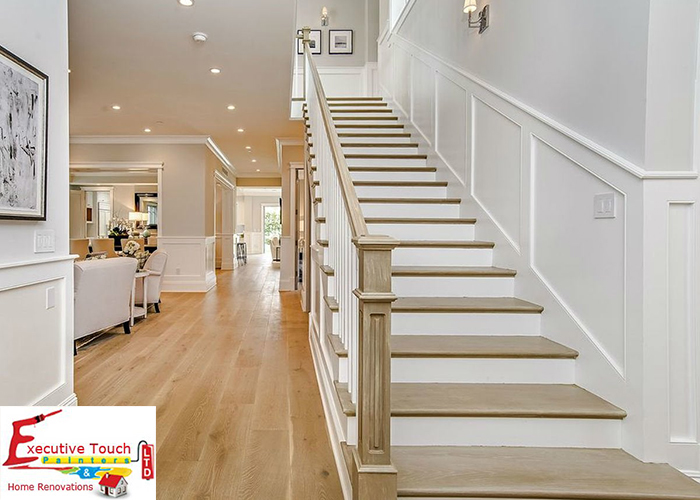
11. Colors For Staircases

Wainscoting not only protects your walls but also adds beauty to entryways, hallways, and other high-traffic areas of your house. Whiteboard and batten wainscoting can always be a great idea to keep scuff marks away from staircases.

12. Top To Bottom

Wainscoting is used to cover one-third of the interior walls sometimes, and it is advised to extend the panels to the roof. The raised mojo panels in the traditional wainscoting give a feeling of an increase in the height of space. To add beauty and increase the space of your rooms, it is advised to paint an entire wall with the same color.

Conclusion

Wainscoting is one of the best ways to give your interior and house a beautiful look. There is no limit to the budget for wainscoting for a normal house, but you need to use good choices for the bottom parts of your walls. If you are a homeowner looking to try out a wainscoting feel for your interior walls, you need to take the help of a professional house renovator. Executive Touch Painters have over 30 years of experience in interior and exterior painting. Contact us for more details.

Categories
Interior Painting

Different Types Of Interior Paint

When the time for painting your home has come, then choosing the paint color is not the only you need to consider but also the type of paint that has to be used for your house. Choosing the right type of paint decides the finish of your house and the home’s final look. There is a wide range of paint types available in the market, and it is important to understand which one works better for your rooms and house. If you are a homeowner looking to paint the interiors of your house, then read the article to know the different types of interior paints available.

Types Of Interior Paint For Your House

Choosing the type of paint depends on the amount of shine and durability needed for your home. Here are some of the common finishes for your home

1. Flat Finish

Latex paint works great for ceilings, and a shiny finish is available. Flat finish is available only in Latex paints and is opaque and sophisticated. Latex paints are not suitable for kitchens, children’s bedrooms, and bathrooms.

2. Egg Shell Finish

The eggshell finish is mostly done for decorative finishes and provides a low luster. The eggshell finish is also not suitable for kitchens and bathrooms.

3. Semi-Gloss Finish

Semi-gloss paint will give your room a subtle shine. It’s scrubbable and good for moldings, doors, windows, kitchens, and baths.

4. High-Gloss Finish

A high-gloss finish has a shiny, polished look. It’s also stain-resistant and very scrubbable, making it a good choice for the areas of a home that get the most wear and tear, such as kitchens and baths.

5. Oil Paints

Oil paints are traditional because of their durability, versatility, higher gloss, and longer. Their hard finish resists stains and damage while being easier to clean. The main disadvantage of oil paints is that they release volatile organic compounds and have a long drying time. While working with oil paints, make sure that the place is well ventilated, always wear a mask, and avoid exposure to children.

6. Latex Paints

Latex paints have the edge over oil paints in resisting mildewing and yellowing. Choose latex paint for any room that tends to get extra moisture, such as your bathroom, kitchen, or laundry room.

7. Matte Paint

Sometimes, people use the terms matte and flat interchangeably when speaking about paint types. Matte paint is ever-so-slightly glossier than its flat cousin. This isn’t quite accurate as there are minor differences between matte and flat finishes.

8. Satin Paint

Satin paint is similar to eggshell with some minor differences. Satin paint is much glossier than eggshell paint and suits most of the needs of people. The paint is the most durable option for all your rooms and lasts for many years.

Contact An Experienced Interior Painting Company

A new coat of paint for your interior makes a difference and gives a beautiful for your home. Fresh paint can modernize and brighten the spaces of your rooms as long as the right color and type of paint are chosen for your home painting project. If you are a homeowner looking for an interior painting project, you must contact an experienced professional interior painting company. Executive Touch Painters has over 30 years of expertise and experience in Interior painting in Toronto. Contact us for more details.

Categories
Interior Painting

How To Estimate Interior Painting?

Home painting is one of the easy and effective ways of decorating your home. Whether interior or exterior painting, there are many variables involved in painting. As a homeowner, you need to think about the rooms’ conditions, any work is to be done for them, the type of paint to be used, and the cost involved in painting the whole house. Another thought to be made is whether you are ready to hire a professional and know the estimation of the whole painting job. Once you have decided to paint your house, read the article to estimate interior painting for your home and proceed with the work.

Steps To Estimate Interior Painting Job

Here are some of the basic steps to be followed to estimate your interior painting job for your house.

1. Estimate The Cost Of Paint

After measuring your house, it is time to calculate the amount of paint needed. The paint cost can be from $15 to $80 per gallon, depending on the brand you choose. It is advisable to determine if any discount can be applied on the contractor side and the discount they are willing to give if you become a regular customer.

2. Estimating The Cost Of Materials

For doing the painting job, there is a need to have materials like primer, tape, caulking tubes, masking paper, paintbrushes, and masking plastic rolls. The number of materials required depends on the number of doors, windows, and brick roof lining are present in your house.

3. Estimate Cost Of Labor

Estimating the labor cost can be tricky because there are many elements involved. The labor cost is typically calculated per hour, and the cost can go up if the painting job involves tough tasks like embedded windows, hard-to-access places, lots of prep work, and steep roofs.

4. Estimate Cost Of Marketing

Cost of marketing is a hidden cost that involves paying for lead providers, distribution of flyers, and other marketing ideas. Your painting contractor includes all these costs, and as a homeowner, you must know about the hidden costs involved while painting.

5. Do The Final Calculation

The total cost of the painting job is the total of all the costs given above. The cost of paint, labor charge, materials cost, and marketing cost total up to the cost of the interior painting budget for your house.

The Cost Of Painting An Average Room

The easy way of calculating the average paint cost of any room is knowing the room’s area and deducting the areas that need not be painted. Every painting company has a specific charge to paint per square foot, and the average cost would be around $380 per square foot, including the paint cost. The extra charge would be collected for wall repairs, priming, painting the ceiling, and painting the closets.

Factors That Make Pricing Higher

Here are some of the factors that make your painting job higher

  • Using Top Quality Paint
  • Lot of Prep Work to be done
  • Removal of Wallpapers and other residuals
  • Water stains on Ceilings
  • High ceilings
  • A lot of Furniture to Move
  • Special trimming jobs
  • Textured and Popcorn ceilings
  • Very Large Homes with large rooms

Contact A Professional Interior Painting Company

If you are a homeowner looking to paint the interior of your house, then you need to hire a professional painting company. The cost of interior painting for your home depends on the estimate prepared by a professional painting company. Different painting companies render their services to customers in and around Toronto. Executive Touch Painters has over 30 years of experience in painting homes in Toronto. Contact us for more details.

Categories
Interior Painting

How To Prep Brick Fireplace For Painting?

If you have grown bored of your fireplace, it is time to paint the fireplace’s bricks. A fresh coat of paint creates a cozy place in your house and will be an inspiration to the guests coming to your home.

Most homeowners think that red brick is permanent and cannot be changed. Fireplaces are made of red bricks, which can be painted to lighten the look of your home. Follow the below steps and see how easy it is to paint fireplaces of your house.

Preparation for Painting a Brick Fireplace

Materials Required
  • Paintbrush, Roller, and Tray
  • Painter’s Tape
  • Primer
  • Paint
  • Drop Cloths
  • Caulk and Caulk gun(only if needed)

Steps To Be Followed

Step 1: Cleaning the Surface

Use a wire brush, clean all the dirt and debris from the surface of the bricks. You could use a vacuum pump to clean further the place which cannot be reached by a wire brush. Use a sponge to clean the surface with cleaner or degreaser. Deep cleaning is necessary as any dirt present will cause the paint to peel.

Step 2: Preparing the Surface

Some areas around the fireplace need not be painted. To protect these areas, prepare the surfaces by laying plastic sheets and tapping off areas not painted.

Step 3: Caulking the Surfaces

If bricks have cracks or holes, fill them with caulk. After the caulk is applied, smooth the surface using a wet paper towel.

Step 4: Prime the Brick

After cleaning, it is time to apply the primer. An oil-based or stain-blocking primer can be used to protect bricks from stains. Apply primer all over the fireplace as per the instructions given.

Step 5: Paint the Bricks

Once the primer dries, it is time to paint. Choose paint that withstands the temperature of the fireplace. Indoor, latex, heat resistant paint is rated to withstand temperatures generated by the fireplace. Roller can be used for painting the bricks, and for places where the roller cannot reach, use a paintbrush. Apply second or third coats if needed.

Conclusion

A Painted fireplace looks very attractive and adds beauty to your home. Bricks need to be cleaned and painted regularly to keep them fresh. If you are looking for a professional to paint your fireplace, contact Executive Touch Painters at 416-410-0164 for a free estimate.

Categories
Interior Painting

Interior Painting Checklist

Before starting to paint a room, you have to know all the supplies needed for completing the painting as required. The decision to paint a room does not end with selecting your favourite paint colour, and you have to choose the correct interior painting supplies. There is a wide range of supplies to choose from, but only some are important.

Here is a Checklist of Interior House Painting Supplies that You Need

1. Paint Brushes and Rollers

Standard paintbrushes used in the interior painting are

  • Angled Brush: This brush is used for painting straight lines. Using this type of brush, it is easy to paint lines around ceiling doors, windows, and woodwork. An angled brush gives a steady grip while painting.
  • Roller Cover: Used for painting smooth walls.
  • Small Craft Brush: Short bristled brushes are handy while painting window trims and doors. These brushes are perfect for painting around doorknobs, light fixtures, and hard to reach areas.
2. Painting Trays

For painting, metal trays without lines can be used. Rollers are best with these trays. While using small brushes, use plastic cups or containers that can be easily carried while using ladders.

3. Tarps and Tape

While painting in interiors, there is a chance that paint might splatter on the floor or furniture. Plastic tarps or plastic garbage bags can be used to protect the floor and furniture. Plastic bags might become slippery so that cloth tarps can be an alternative. The tape can be used to taping off light fixtures or other areas that are difficult to paint around.

4. Ladder and Step Stool

A ladder and small step stool can be used for painting high walls.

If you are planning to hire a professional painter rather than DIY, you must hire a company, which not only gives detailed quotes but also has experienced painters.

Check List to Hire Professional Interior Painters

  • Do the painters follow time slots?
  • Are all the floors and surfaces protected with drop cloths or sheets?
  • Are all the walls properly prepared and cleaned before painting?
  • All the Water stains are properly sealed to prevent bleeding.
  • Are all the trims are caulked and properly sanded?
  • Thermostats, knobs, hinges, and other surfaces are taped off, so they don’t get paint on them?
  • Colours are checked twice and ensure that they match the other walls or doors.
  • Inspection of newly painted surfaces to ensure proper coverage
  • Proper clean-up of the surfaces after completion of the project
  • Re-installation of switches and outlet covers after the project.

Conclusion

When looking to hire a professional painting company, you need to see that all the above lists are quoted and discussed with you before starting the painting project. Our painters are ready to walk through the process and provide a no-obligation quote. Call us at 416-410-0164 or contact us for a free quotation for your interior painting project.

Categories
Interior Painting

How To Paint Interior Doors?

Painting an interior door of your house is a do-it-yourself project that can be completed quickly. As most of the interior doors are heavy and hard to move, most people attempt to paint the door in place, instead of taking it off its hinges. The best way to correctly paint a door is to place it flat on the sawhorses. Always seek the help of a professional or paint store to determine the amount of colour that is required to paint a door.

Steps to Achieve a Perfect Finish to the Door

1. Preparing the Work Area

Before sanding the surface, all the hardware on the door is to be removed. Place the hardware like knobs, plates, and lock mechanism in a bag, so that it is easy to replace them after completing the paintwork. If it is not possible to remove the hardware, then you could use painter’s tape or two coats of rubber cement, which can be removed easily.

If there are holes in the door, then cover them with putty. Clean the dirt and grease on the door using sponge saturated in tri-sodium phosphate.

2. Sanding the Surface

After cleaning the interior door, it is time to sand the surface. If the door already has oil-based paint with latex, then you need to sand it very lightly.

3. Adding Primer

Apply a coat of good quality primer on the surface of the door. Generally, a water-based gloss primer is suitable for all types of wooden doors. A good primer will help the paint to glide on the surface more smoothly. Check for instructions and see how many hours it will take for the primer to dry.

4. Start Painting

Use broad and even strokes to paint on the surface of the door. To create a smooth finish, avoid going back onto the areas that are already painted. It is recommended to apply two coats of paint and allow the first coat to dry before going for the second coating.

5. Put Back the Hardware

After the paint is thoroughly dried up, put back the hardware on the door and fix them. If you have removed the door from hinges, place the door back into its place after the paint has fully dried.

Painting an Unattached Interior Door

Steps to follow for painting an unattached door

1. Removing the Door

Remove all the hardware present on the door. Pull the lower hinge pin out using a screwdriver and hammer. Ask your helper to hold the door in place as you drive out the pin. Now for painting on the surface of the door, place the door on sawhorses.

2. Painting the Door

Always use the recommended paint types for the wooden surfaces. Use good brushes to paint on the panelled doors by following a particular order. First, paint the recessed panels, next horizontal rails and lastly, paint the vertical stiles. By following this order, there is no chance of leaving unnecessary brush trails.

3. Let the Door Dry

If a second coating is needed, wait for the first coat to dry. Before the second coat, make sure to sand the surface lightly and wipe with a cloth.

4. Seal the Bottom with Wood Sealer

To prevent moisture from entering into the surface of the door, use a clear wood sealer to seal bottom edges. If there is no sealing, water will cause the wood to warp and swell, making it difficult for closing the door.

Painting an Attached Interior Door

It is easy to paint an attached door. Follow these steps for painting.

1. Apply Paint to Inside Top Panels

At first, apply colour to the inside of the top panels. Paint by working with the grain of the surface. Paint the recessed areas first and then move to the faces of the panels.

2. Paint the Vertical Center Stile

If the door has vertical center stile, then paint this part and blend in the brush marks from the center stile while painting the horizontal rails.

3. Paint the Vertical rails and vertical stiles

Now starting from the top, paint the rails to the bottom. After completing rails, paint the vertical stiles beginning from the left side. Keep the line as straight as possible while painting the surfaces. You could use a brush or roll to paint the door.

Painting Flat Door

Remove all the hardware on the door, and it is not necessary to remove a flat door from the hinges. Removing the doorknob and others will make your work easier and faster. You could use a roll or brush for interior door painting. For painting the edges around the hinges, use a small thin brush to get a smooth finish.

Conclusion

At Executive Touch Painters, we provide Interior painting services and also help you in selecting the best colours that are perfect for your house interior. Our services include wallpaper installation, cabinet painting, crown mouldings, family rooms painting, and kitchen renovations. For a free consultation, call us at 416-410-0164 today.

Categories
Interior Painting Kitchen

Can you Paint Foil Cabinets?

Yes, thermo-foil cabinets in your house can be painted. Thermofoil cabinets are used in modern kitchens and known for being affordable, easy maintenance, and versatile. The material of thermofoil does not contain metal but is made from the Vinyl Onto Medium-density fibreboard(MDF). The cabinets are created by vacuum pressuring the thin layer of the material, which results in a smooth and seamless finish that lasts for years.

Despite being beautiful, there are some disadvantages of thermofoil cabinets. Exposure to sunlight, heat from appliances, residue from the food, and regular wear and tear causes peeling and chipping of the cabinets. To overcome these problems, the cabinets need to be painted.

Supplies Needed for Painting Thermofoil Cabinets

There are limited supplies required for painting foil cabinets of your home. Here are some of the items needed to get the best durable and beautiful look on your cabinets.

  • Primer
  • Paint
  • Painter’s Tape
  • Plastic paint tray
  • Foam Roller
  • Foam Brush
  • Sanding Block

Procedure for Painting Foil Cabinets

Thermofoil material is porus, and it is hard to spread paint on the surface evenly. A coat of paint applied on the surface will easily peel off after drying. So you need to follow some steps to paint kitchen cabinets in your house. Even though the process is time-consuming, the results are worth it if done correctly.

1. Preparing the Surface

Before starting to paint the surface, you need to prepare the surface of the cabinets. Kitchen cabinets are usually covered with cooking oil and other food materials. So you need to remove the hardware of cabinets and use an ammonia-based cleaner to clean the surfaces. After cleaning, let the surface get dried up. Now use sanding paper to rough up the surface, focus on creating texture on the surface and be careful not to remove finishing of the cabinet. You could use an electric sander to complete the work faster. After sanding, remove all the dust using a damp rag. Use painter’s tape to cover the areas that you would not like to paint.

2. Applying the Primer

Apply at least three coatings of a thick and good primer on the surfaces. While applying the primer, check whether there are spots where the primer is not absorbed. If there are any spots like that, you need to sand the area again and apply primer after cleaning the sand. Allow each coating of the primer to dry before the application of the other coat. Allow the final coating to dry for 12-24 hours.

3. Applying Paint

You will probably need two coatings of paint as much of paint will soak into the primer that was applied to the surface of cabinets. The number of coats required will also depend on the quality of paint chosen for the foil cabinets. Use Enamel paint, if you want a glossy finish. But if you are not interested in a glossy finish, then you can go for satin finish latex paint. Using a foam roller will help in giving a smooth finish. Between coats, you could lightly sand the surface with a fine-grit sandpaper.

Allow each coat to dry completely before going for the next sanding and coat.

4. Sealing the Cabinets

After the cabinets have dried up completely, for extra protection, you could add a coat of water-based polyurethane, which comes in matte, satin, and gloss finishes. All the finishes are good for your cabinets and make sure to use good quality brushes for applying the paint and finish. Allow the cabinets to cure for about 10 days.

5. Reattach the Cabinets

After the cabinets have dried completely, replace the hardware and attach the foil cabinets to their original places. Drill new holes if needed in place of old holes.

Conclusion

It is tough to paint the thermofoil kitchen cabinets. It would help if you took the advice of local professional painters to know the correct primer and paint that is suitable for your home. Most of the times, the semi-gloss sheen is used for cabinets, to give a new look to your kitchen. We at Executive Touch Painters are experienced in renovation and painting of all types of kitchen cabinets. Contact us or Call us at 416-410-0164 for a free estimate of your painting project.

Categories
Interior Painting

Professional Color Consultant

Executive Touch Painters is 30 years experienced Toronto Professional Color Consultation company for your home and business, and a lot has changed from where we have initially started. Even the trends are changing, the good tastes of people have not changed. People are always looking to have the best for their houses.

There are thousands of colors to choose from, and many homeowners get often confused about picking up the right color for their house. It would be best if you considered various factors like furniture, the layout of the house, colors of curtains, flooring, pictures, curb appeal, and so on. Our professionals are always there to help you to choose the perfect color for your home.

Our color consultation with the clients is a collaborative process, and our group of online paint color consultant professionals will work to pick up the right color palette for your house. We create a working relationship with you and create color pallets that reflect your style and personality. We take the responsibility to educate and engage you in the process. Even though we are providing guidance, the final decision is yours, and we make sure that the result is always beautiful.

The Process

The initial step involves discussing the project briefly over the telephone. After the conversation, a few hour session is conducted in your house for further discussion. The meetings may be extended based on the size of the project.

In the next session, we sit with you to find out your goals and expectations and also know more about your style and personality. A walk-through is conducted to assess the fixed finishes like the floor, furniture, counter-tops, etc. Based on a full analysis of all rooms, we can be able to make the recommendations and guide you. Several options are provided based on the analysis, and if you have trouble choosing the right one, then our guide will suggest the best option. The final decision is always yours.

After the colors are picked, we are ready for the next step. A group of professional painters is allotted for your project at affordable prices. We always strive to make house painting a beautiful experience.

The color scheme for your home depends on various factors like your personality, style, lifestyle, and existing elements of your house. Your furniture, shades of curtains used, flooring, and rugs used are also crucial while choosing colors for your home.

Call Our Color Consultant for the Perfect Color Tones

Works done by our professionals are 100% guaranteed. If you are searching for a Painting company in Toronto that provides color consultation and painting services, then contact Executive Touch Painters for a Free Estimate. For more information and a free quote, call us at (416) 410-0164.

Categories
Interior Painting Painting Ideas

2020 Painting Color Trends

If it has been many years since your house is painted, then a fresh coating would be an inexpensive way of changing the look of your home. There are many trends followed in painting houses, and each year a new trend is observed. Modernize your space with the latest paint colour trends 2020 if you intend to sell the house.

Current Paint Color Trends 2020

1. Green Color

Green colour brings nature back to your house. In this technological life where people are busy in their lives, using green colour helps them to rejuvenate and bring back nature. There is a wide range of green shades that are used in the present era.


  • Mint Green: perfect for small spaces, bathrooms, etc. Mixes well with white colour
  • Moss Green: Suitable for bedrooms as the calming atmosphere is created
  • Sage Green: Introduces energy into any interior space
2. Soft Earth Tones

Want to create a warm environment for your house, then paint with neutral colours. Below trending paint colours are safe for the year 2020


  • Hazelnut Brown: is a colour that can be used for any room
  • Mushroom grey: This is a warm and soft shade colour that looks beautiful for hallways, kitchens, and living spaces.
  • Cider Brown: Use this colour to bring autumn to your home. Bathrooms, bedrooms, and entryways look beautiful in this colour.
3. Shades of Blue

Blue is the next colour opted by most of the home decorators. Here are some of the shades that are the most popular


  • Blue-grey: Color of clouds that creates a soothing and serene atmosphere for the rooms. This colour is ideal for bathrooms and bedrooms.
  • Icy-blue: This soft and light colour is perfect for brightening small spaces
  • Navy-Blue: Suitable colour for large rooms having vaulted ceilings
Bright and Colorful Culinary Inspired Hues

Earthly tones are not out of trend at any time. But if you want to use bright and bold colours anywhere in your home, then the kitchen is the perfect place to experiment with these trending paint colours.


  • Turmeric Orange: This lavish and exotic colour is perfect for sunrooms and outdoor spaces
  • Cayenne Red: Can be a beautiful showstopper for any place. Famous for kitchen, dining, and front rooms.
  • Mustard Yellow: Is an energetic and optimistic colour that is an excellent colour for the exteriors. The colour is a suitable accent colour, in-home office.

Implementing 2020 Paint Color Trends

There is no need to paint your whole house with the above mentioned popular colours for 2020. Enjoy the benefits that these colours offer by just implementing them in small doses.

Here are some of the ideas

  • Use these colours to paint your accent wall of a living room or bedroom
  • Paint the guest room with the famous 2020 colour trends
  • Paint the front door with a new colour and upgrade the kitchen cabinets with a fresh coat
  • Revitalize old furniture with new colours
  • A fresh coat of painting for window trim and garage doors.

Conclusion

Paint colour trends change from time to time, and you should learn to update your house with trending colours. If home painting is in your mind, then never hesitate to contact Executive Touch Painters in Toronto for a free estimate. We provide interior, exterior, and commercial painting services in Toronto and the GTA. Call us at 416-410-0164 to fix an appointment.