Categories
Home Renovations

Why Drywall Repair is Important Before You Paint

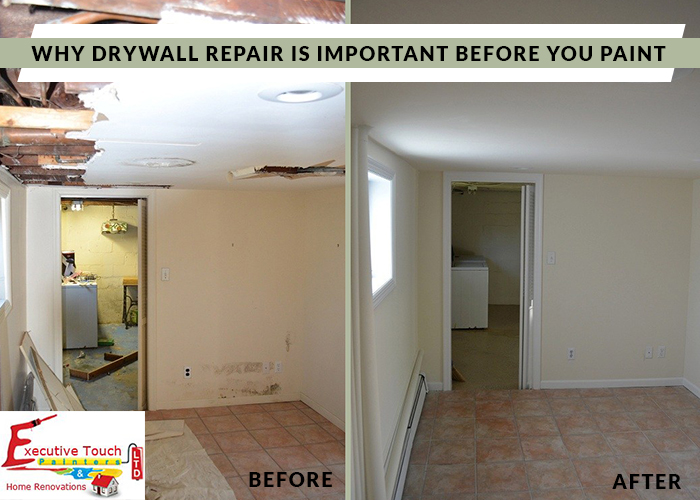
Renewing, repairing your interior with a new coat of paint is a tremendously simple task, mainly if the drywall is in proper condition. However, if the drywall shows signs of damage, repairing it prior to painting is vital to get professional results.

Why Do Repair Drywall?

Beyond the apparent aesthetic problems, there are numerous reasons to get drywall repaired. Drywall has many features. However, one of the most crucial is to keep the factors out of your home. Holes and cracks may also let wind, construction residue, pests, insulation, and moisture into your house. Drywall damage also makes your home less energy efficient, as heat and air conditioning break out through damaged areas of drywall.

Holes

Repairing Drywall Holes

To repair holes in drywall, select a quality spackling compound for small holes and joint compound for large holes. With a putty knife, use the filler to cover the hole and spread it thinly around it. Allow the filler to dry and practice one more coat, without overloading. After the second layer has dried, use fine-grit sandpaper to clean the surface. Also, you could use self-adhesive drywall patches to repair holes up to six inches in diameter. In case the wall has multiple holes in it, the great thing to do is to replace the damaged section or the whole sheet. To replace a damaged part, reduce it down with a utility knife and remove it. Cut a corresponding piece of new drywall and use screws to attach it to the prevailing studs. Then, use a quick-drying joint compound to fill in any gaps among the new section and existing drywall, let the compound dry and sand the surface.

Loose Tape

Repairing Drywall Tape

Tape effervescent and lifting away from the wall surface is another well-known drywall hassle that needs to be repaired. Use knife to cut bubbles, dispose of the tape and fill the hole with joint compound. Use a new strip of tape and cover it with a thin layer of joint compound. Subsequent the synthesis dries out, sand imperfections away.

Water Damage

Block Water Leaks

In case of great water damage, the best solution is to replace the whole drywall sheet. If the structure of the wall hasn’t been compromised, you could look at drywall repair techniques. Before trying to repair drywall, finding and fixing the source of the damage is essential to prevent trouble recurrence. Once the critical repairs were made, allow the drywall to dry entirely and check its condition. If there are any water stains, use a very good-quality stain blocker to prevent stains from bleeding through the finish paint. To repair superficially damaged drywall, scrape off the loose layers of paint surfaces and topping compound, deal with the regions laid low with a mold with the anti-mold solution and allowed the drywall well. Then, apply a high filler over the repair area, let it dry completely and sand down any bumps with fine-grit sandpaper. If the water-damaged region is soft and spongy, it’ll most probably want to get replaced.

Hairline Cracks

Repair Cracks

Hairline cracks commonly appear at inner corners of walls. In this situation, drywall repair involves making use of acrylic latex caulk, which is flexible sufficient to resist the movement among adjacent walls.

Is Drywall Very Costly To Repair?

Never. For small holes, a patch may be made from another piece of drywall. That is fitted into the hole (that is frequently enlarged to contain the patch neatly), taped into place, applied coats of paint & primer, cemented, and refinished so that the repair isn’t visible.

In more significant damaged portions, the elimination of complete pieces of drywall can be done, however, new parts aren’t expensive, and the labor isn’t so hard or costly to break your budget.

Drywall repair is nearly never a huge task when you understand how easy and beneficial it is to repair your drywall problem, however, house owners sometimes worry that it’ll be.

Conclusion

Maybe it looks drywall repair an easy job that can be done on your own. But repairing your walls without any mess ups requires professionals even if it involves minor repairs. If you really need a long-lasting drywall repair and Interior painting results. Contact or Call our professionals at 416-410-0164 for a free estimate.

Categories
Interior Painting Kitchen

6 Attractive Reasons to Paint Your Kitchen Cabinets

Many house owners in Toronto take some time to think about methods of upgrading their home. However, many limit what they do because they will not have the budget for it. This means some parts of the house tend to be forgotten, which includes the kitchen cabinets. However, painting offers you with many benefits of which you will be unaware. Here are some reasons to paint your kitchen cabinets.

Benefits of Painting Kitchen Cabinets

New Aesthetic Attraction

In case you recognize your shelves becoming dull or diminished, we suggest painting them to bring them back to life. This not only makes them more significant aesthetically attractive, it additionally offers increased value to your house over the long-term.

Kitchen Renovation Is Affordable

Painting your Oak Kitchen cabinets could make a massive difference in the look of a kitchen. It could remodel the complete room to feel like it’s been made over. The new hardware also can give even stock cabinets a custom look and experience.

Modern Colors To Impress

Many kitchen cabinet doors and shelves have the same colors, timber or white. They all seem the same with very little to break up the colors. By painting the cabinet’s frame, you’re able to liven up the kitchen with your favorite colors or accents to provide an entirely new feel to the room.

Increase The Value Of Your House

One of the major elements that people take into account when looking to buy a home is the look of the kitchen. By painting your kitchen cabinets doors and drawers in a favorite color, you could provide your kitchen with a main upgrade and greatly increase the value of your house in the eyes of potential buyers.

Paint Colors to Save Time

Complete kitchen renovation or remodeling is worrying and stressful. It could also take a long time to get the whole thing to complete, mainly with a limited budget. While painting the kitchen upper cabinets, you could make time and avoid becoming overwhelmed. You could apply a coat of paint at a time, stop, and paint again whenever you’re prepared.

Paint To Stick Around

Painted furniture and cabinets are great proper now, and painted cabinets can update an older kitchen. Also, you could paint other furniture pieces to your kitchen which includes buffets, hutches, dining sets, etc. to suit or compliment your cabinets. It’s an excellent way to tie in all your colors.

Conclusion

Painting kitchen cabinets will create a great impact on your home because no home is complete without a kitchen. With the help of professional painters like Executive Touch Painters, you will get the paint job done right.

Contact or Call us Today! on phone at (416)-410-0164 or online for a Free Estimate.

Categories
Commercial Painting

How to choose the Right Colour Palette for Your Business Interior

Choosing the correct color pattern for your business Interior is a tough job. The color chosen needs to be subtle and elegant at the same time for the office environment. To keep the shade of the office perfect, you need to keep some of these critical factors in mind. The color palette you pick reflects the mood and efficiency of the workers in the office. A perfect shade in the workstation will bring a lot of positive energy into the working environment. Countless books wrote about how to boost your work productivity, but all you may have just needed a paintbrush, showing the importance of color in your office.

Office color not only affects the work of your staff but also the effects the clients visiting your office. A client evaluates your business by the look of your workstation and its color appearance. So it is essential to present yourself in right colors both for your staff and clients.

Paint or Color Schemes for Your Office

Blue

One of the most commonly used colors in the office is Blue. Blue Color has a lot of positive energy in it, and it also has a unique style for itself. So to bring style to the office blue color is a perfect choice. The color blue symbolizes confidence, security, honesty, loyalty, and conservatism. Blue often associates with depth and stability; it communicates a genuine and reliable outlook while boosting relaxation and intellectual thoughts in the staff.

Green

Green also the most used color in offices. The green color connects to wealth and growth, and it also offers you a calm and very confident environment on the workstation. The darker shade of the green color represents prestige and also reflects a more controlled, responsible and confident atmosphere and represents balance and growth. A color which reconnects us to our natural surroundings. The best way to introduce green into your office space is via green walls and potted plants.

White

Represents purity and cleanliness; a safe bet, but sometimes safe can equate to being dull and uninspiring. White is best to be used in the break out areas of the office and remember to give a nice and glossy finish. But keep it to a minimum.

Purple

Purple refers to royalty, ambition, and luxury. But at times it could be artificial due to its non-appearance in nature. So blend it with other colors to make it look fabulous and luxurious.

Red

Red has the capability of invoking passion and raise the mental energy flow in staff. It also apparently enhances metabolism, increases respiration rate. But an overdose of red can be overpowering and leads to adverse effects.

Yellow

Yellow is said to be the best color for areas of teamwork, as its bright tone can raise positivity and happiness in the staff. Yellow stimulates mental activity and generates muscle energy, but it also apparently reminds people of food funnily enough.

Orange

Orange is the most acceptable color among the youth. It represents happiness, success, and determination. Orange is highly visible color and quickly grabs attention. Use this color to highlight the essential element in your office.

Not only these colors many colors can be used for your office space. So now you know the importance of colors in your office. Paint the perfect color for your office and see the magic. Use the perfect blend of colors to create an ideal workstation for your staff.

Contact our Toronto Painters for converting your office into an inspiring and exciting environment to work. Or Call us now at (416)-410-0164 for a free quote.

Categories
Uncategorized

Lead Based Paint Canada

The Issue

Many older homes in Canada are decorated with lead-based paint. Removing or distributing this paint as part of a renovation project could expose people in the home to serious health risks. However, the risk can be minimized by following a number of guidelines.

Background

Lead Poisoning: People have known for a long time that exposure to lead is dangerous. Lead poisoning can cause anemia. It can also damage the brain and nervous system, resulting in learning disabilities.

The risks are greater for children than for adults because children’s growing bodies are able to absorb lead more easily. Even a small amount of lead dust is dangerous to infants and children. Lead taken in by mothers-to-be can also pose a danger to the health of unborn children.

Lead-based Paint in Homes: The likelihood that your home contains lead-based paint depends on when it was built and painted. Homes built before 1960 probably do contain lead-based paint. If your home was built after 1980, there is no need for concern about lead levels in interior paint, but there may be the lead in the paint used on the outside. There is no need for any concern about leaded paint in homes built after 1992 because by that time all consumer paints produced in Canada and the United States were virtually lead-free.

It is not always in your best interest to remove lead-based paint. In some situations leaving leaded pain alone, as long as it is not chipping or within the reach of children, is safer than trying to remove it. Covering the painted area with vinyl wallpaper, wallboard or paneling can provide extra safety.

However, lead-based paint in the home is a serious health hazard when it is chipping or flaking, or it is within the reach of children who might chew on it. In such cases, you should remove the paint following very specific guidelines.

Minimizing Your Risks

It is not safe to use sanders, heat guns or blowlamps to remove lead-based paint. These methods are counter-productive because they create dust and fumes that contain lead.

Homeowners should consider hiring experts to do the job. However, if you decide to do it yourself, use a chemical paint stripper, preferably one with a paste that can be applied with a brush. Chemical strippers contain potentially harmful substances themselves, so use them carefully.

  • Keep children and pregnant women away from the work area.
  • Remove furnishings from the work area. Use plastic sheeting to completely cover anything that cannot be moved.
  • Isolate the work area by covering doorways and vents with plastic sheeting and tape. This will prevent the spread of scrapings, chips, and paint particles to other parts of the house. Before starting work, make sure the room is properly ventilated. Set up a fan so It blows air out through an open window. Start by applying stripper near the fan and work your way back, so the fumes are always blowing away from you.
  • Always wear goggles, gloves and a good quality breathing mask. If you spill any chemical stripper on your skin, wash it off right away.
  • If you get stripper on your work clothes, take them off immediately. Wash them separately from other clothing.
  • Work for about ten minutes at a time, then take a break outdoors in the fresh air. Leave the work area right away if you have trouble breathing, get a headache, or feel dizzy or sick.
  • Never eat, drink, or smoke while removing paint, and keep anything that might cause a spark or static electricity out of the work area.
  • Clean the work area thoroughly at the end of each day. Put paint scrapings and chips in a sealed container marked Hazardous Waste. Then wipe down the work area with a clean damp cloth, and throw the cloth away.
  •  Do not throw out paint scrapings with the regular trash. Your local municipality can tell you the best way to dispose of old paint scrapings and other hazardous household wastes.
Before Your Renovate

There are several ways to find out whether the paint in your home is lead-based. Some independent contractors have special X-ray equipment that can sense lead on paint surfaces.

Another option is to send paint chips to a lab that specializes in analyzing lead concentrations in the paint. The two organizations that certify labs for this purpose are:

  • The Standards Council of Canada
  • The Canadian Association for Environmental Analytical Laboratories

Be sure to contact the lab first, and follow all directions for gathering and sending the paint chips.

Need More Info?

Your family doctor can order a simple blood test to find out your level of lead exposure. For further information, contact your doctor or the Poison Information Center nearest you.

Health Canada – Consumer Products site:
http://www.hc-sc.gc.ca/english/protection/consumer.html

Health Canada – Lead Information package:
http://www.hc-sc.gc.ca/hecs-sesc/toxics_management/publications/leadOandA/toc.htm

Categories
Home Renovations

How do I keep my deck looking great?

Sitting out on the deck enjoying a drink or barbeque with friends is one of the quintessentially awesome things about summer. So keeping your deck in great condition is important. Regular maintenance will help to ensure that your deck lasts for many years and that many more great memories can be made there. It will also help you to catch any problems early and avoid more costly repairs down the road. A maintenance schedule can help keep you on track.

Late Spring – Cleaning

When you’re doing your spring cleaning, don’t neglect your deck. A dirty deck is more prone to mold and mildew. Clean debris from between deck boards using a putty knife, remembering to get into areas where deck boards cross joists. Then sweep and clean your deck with the appropriate cleaner. And remember when you use any chemical cleaner to protect surrounding plants with a cover, and wear your own protective clothing as well.

Late Spring – Sealing

Late spring is generally a good time for re-coating your deck following the instructions in question 7. The timing is good because the weather is dryer than it is in early spring but still not so hot as to make the job overly uncomfortable or to cause significant problems with evaporation.

Midsummer – Repair

Inspecting your deck at least once a year and repairing any minor issues is a good way to avoid major repairs down the road. When you get some days of warm, dry weather it is an ideal time to do some deck inspection. Typical problems areas that you’ll want to pay close attention to are any areas where there could be water buildup such as next to planters, downspouts or any area that is within six inches from the ground.

Look for signs of rot by probing structural areas with a flat blade screwdriver. You should not be able to push a screwdriver more than a quarter inch in – if you can, you likely have rot. If you discover very small areas of rot (no bigger than a silver dollar), these can be repaired by chipping out the rot and then repairing the hole with a wood preservative. Larger areas of rot will likely require replacement of the boards in question.

Of utmost importance in this annual inspection is to use a flashlight to inspect the ledger under the deck. The ledger is the piece of framing that attaches your deck to the rest of the house. Ninety percent of all deck collapses are the result of a faulty or damaged ledger.

The metal cap covering the top of the ledger (called the flashing) should be in good condition – no rust, no holes.

Check any remaining beams, joists and posts and replace any hardware that is badly rusted. If anything looks questionable, call a contractor to have it repaired. Finally, check the railing to make sure that is secure and that you won’t have a guest who inadvertently ends up in your rose bush when they put their weight on the railing. Loose railing connections can often be remedied with galvanized lag screws but if you are in doubt, call a contractor.

Early Fall – Preventative Maintenance

In Canada at least, fall your last chance in the season for washing and sealing if you didn’t get to it earlier in the year.

Other steps that you should take during this time are trimming nearby shrubby, sweeping away fall leaves moving planters to avoid moisture buildup.

There is no doubt that maintaining a deck requires work, but when you have deck that looks great for many years, it is clear that the effort is certainly worth it.

Categories
Uncategorized

What kinds of faux finishes are available to choose from?

If you’re looking to go beyond ordinary wall paint and make a completely unique statement, then you might want to consider a faux finish. The amount of look that you can get from faux finishes are unlimited however some choices are more popular than others.

Types of Faux Finishes to Chose

Venetian Plaster

For a textured finish that resembles stucco or polished marble, Venetian plaster can be used to give your interior the feel of old-world Europe. The plaster is applied with a putty knife at a 15-30 degree angle to the floor. Once this first coat has dried, the second coat of plaster is applied at a 60-90 degree angle.

Sponging

Sponging is another technique that can add texture and depth to a wall surface. The term sponging actually can refer to two different techniques: sponging on and sponging off. As the names imply, sponging on is when the paint is applied to the wall with a sponge and sponging off is when the paint is applied with a roller and then removed with a sponge.

Whether you choose to sponge on or sponging off depends on how dramatic or subtle you wish the final result to be. Sponging on gives a more dramatic and textured appearance while the end results of sponging off tend to be more subtle.

Ragging

Similar to sponging ragging can give a textured appearance and can either be done with the rag on the method or the rag off method. The end results can be subtle or dramatic depending on your tastes.

Artisan Finish

Another popular finish that gives the appearance of European marble or stone is artisan finish which can be applied to drywall or wood. What makes this style attractive to so many homeowners is the fact that the paint color appears to change based on how the light is shining.

Various applications for artisan finish include tissue paper, crackle, and leaf each giving its own unique look.

Sandstone Finish

Stone finish paints are perhaps the easiest and least expensive choice of all the faux finishes. It involves using paint with a sandy texture that is gritty to the touch when dry. This gives the appearance of a stone wall.

The application is the same as regular paint and, just like regular paint, you can get stone finish paints in just about any color you wish.

Brushed Suede and Leather finishes

In days gone by, many of society’s elite covered their walls in leather. While this would be an extremely expensive prospect today, you can still get the luxurious appearance through the use of a brushed suede or leather paint.

The look is achieved by applying a base coat in small sections at a time with a ½ inch nap roller. Before the base coat dries, the entire wall is covered to smooth out lap marks. Finally, a wide brush is used to apply the suede paint on the wall in a series of overlapping X marks to create variations of color tone.

Of course, there are many more options faux finishes to choose from – you are limited only by your imagination.

Categories
Uncategorized

Is it better to do my painting myself or hire a contractor?

There are lots of people out there who are born do-it-yourself. In some cases, this can be a good thing, as it is almost always certainly more economical to go to your local hardware store and buy a few cans of paint than it is to hire a professional painter. After all, when you hire a professional, you will have to pay for labour.

Reasons to Hire Professional Painter

Lead paint.

If your home was built prior to 1978, it is strongly recommended that you hire a professional who is certified to deal with lead paint. Improper removal can lead to toxic dust which can be very dangerous.

Professional painters are quick.

In addition to the time you would spend if you had to purchase your own paint, rollers and trays, a novice painter usually takes much more time than a professional would. Much of this extra time is due to the fact that a newbie painter must use tape where a veteran of the painting world is able to work freehand. There are also many other details that you may have to consider such as repairing damaged walls, filling holes etc.

Professional painters get the job done right

Unlike novice painters, a professional painter will be more easily able to assess the job and know what is needed before he starts. A professional painter is very accurate in estimating how much paint will be needed for a particular job and what tools he will have to bring along. In other words: no running out to get refills or realizing mid project that he can’t reach that 25 foot ceiling!

You have a big job.

Even if you are a great do-it-yourselfer and you love to paint, you may still want to hire a professional painter if you have a job that is very large. Professional painters make recommendations. You may think that “sunflower yellow” will go perfect with your grandmother’s antique dining room set. And maybe it will. But a professional painter may know different. Since colour’s on paint sample cards rarely look the same once they are on your wall, having the help of a professional can save you a lot of time and headache.

Often, a professional painter will offer to put some paint samples up on the wall so that you can get a better idea of how a particular colour will look in your room. A professional will also make sure that you get the right type of paint for your particular job so you won’t have to worry about having a paint that marks easily in a high traffic area.

In some cases DIY painting can cost you more than a professional. Let’s face it, painting is disruptive because you can’t use a room while it’s being painting. While hiring a professional painter disrupts your use of a room for a few hours, DIY painting can disrupt a room for a week or longer – especially if you work full time and have to do your painting bit by bit. And if the place that is being painted happens to be a store showroom – or an apartment or house that your are trying to rent, then you need to factor in not only the price of the painter, but also any lost revenue that you will have from the job not being done quickly.

Conclusion

When it comes to painting, doing it yourself can be the right choice for some people some of the time – but if the job is a big one, you’re short on time or you simply would rather let someone else take care of all the details that come with painting, then hiring a professional may just be the right choice for you.

Categories
Home Renovations

What are the steps to re-coating my deck?

Summertime is about barbeque parties and spending time with friends and family out on the deck. But if your deck is a few years old and it’s been a while since your last maintenance, it might be looking a little – well, sad. Between the cracks, chips and faded colouring, your deck just isn’t the pride and joy that it used to be.

Well, fear not, because as long as there is no serious damage, it is possible to make that old deck like new again.

The first step to re-coating a deck is to scrape off the old finish with. In most cases, the old finish will flake off fairly easily. Whatever does not come off with the scraper will be removed by the deck stripper. Once you have scraped off as much of the old finish as you can inspect the wood to make sure that nothing is rotten. Do not waste your time trying to clean or refinish anything that is rotten. Rotten wood needs to be replaced before you proceed with the rest of the job.

If there is nothing in need of repair, it is time to start using the deck stripper and deck cleaner.

The deck stripper is used first to remove any old finish that could not be flaked off with your paint scraper. And the cleaner is then used to ensure that you are working with a clean surface before applying a new finish.

There are two main types of deck cleaners. One type made either from powdered hydrogen peroxide or liquid oxalic acid is for removing dead wood fibers from the boards. The other type is bleach based and used for removing mildew.

When using cleaners, be sure to cover surrounding plants in order to protect them. Also remember to wear protective clothing yourself such as safety glasses, rubber boots, gloves, and long sleeves to protect your eyes and skin from any spattering stripper or cleaner.

The best time for stripping and cleaning is on cool overcast days. The reason for this is twofold. First of all, refinishing a deck is hard work meaning the hotter and stickier it is outside, the less comfortable you are going to be. Secondly, cleaners evaporate more quickly on hot days meaning you will have to use more and it will take longer.

When stripping, it is a good idea to work in small – about 6 foot – areas at a time. Doing so will make it easier to keep the area wet so the stripper won’t evaporate before you can finish scraping and cleaning it. You will have to take extra care when refinishing vertical surfaces such as railings, as the stripper will run down the side. The stripper should be in contact with the wood surface for about fifteen minutes before you remove it.

Your deck should be allowed to dry for a couple of days before sealer or stain is applied. Know more about how to stain a deck.

A semitransparent oil stain is the most recommended for railings because solid color stains are heavily pigmented, making your next refinishing job more difficult. Stain is not recommended on deck boards because it will show wear more quickly.

Finally, with your like-new deck, there is nothing to do but show off to your neighbors, invite your friends over for some summer beverages and enjoy your beautiful deck.

Categories
Interior Painting

What are the main factors that I need to consider when choosing my interior paint?

Interior painting is one of the quickest and most inexpensive ways to totally change the appearance of your room.

Factors to Consider for Choosing Interior Paint

Choose the Right Primer

Using the right primer is also of utmost importance. Generally speaking, the darker the wall that you are painting over, the more coats of primer you will need – usually two or three for a very dark wall. Using the right primer is key because your primer needs to work with the paint that you are going to use – otherwise you might have adhesion problems.

Choosing the color

Is one of the first things that people think of when they decide that they are going to have their interior painting done. Keep in mind however, that paint tends to look different on the wall than it does in those little colour samples. The way the paint colour looks can be affected by the type of paint as well, the lighting in the room as well as by other colours in the room such as the colour of the carpet or furniture. In most cases, a professional painter will offer to put a few paint samples on the wall so that you can get a better idea of what your colour choice might look like once the room is complete.

Type Of Paint

Another consideration for interior painting is choosing the type of paint. Whether you choose flat, eggshell, satin, semi-gloss or high-gloss will depend a great deal on your lifestyle and how much use any particular part of the house gets.

For example, if you live in a two-story house, consider the fact the walls around your staircase are more likely to get marked up quickly. A higher gloss paint will be easier to wash, but will also show more flaws.

Flat paint does not reflect light and is therefore the best for hiding flaws. This is good if you live in an older home that may have more plaster-patch-up jobs on the wall. The downside of flat paint is that it is also the most difficult to clean – so it’s not the best if you have small children who like to leave sticky fingerprints everywhere they go.

Eggshell paint has a slight sheen to it. It can still hide flaws relatively well and is slightly more washable than flat paint.

Satin paint is a popular choice for kitchens and bathrooms. It has a medium sheen to it which will stand up to greater levels of humidity and is much more washable than flat or eggshell paint. The drawback is that it will not hide flaws as well.

Semi-gloss paints and high gloss paints reflect the most light. They will not hide flaws but they are both highly washable making them great for high traffic areas.

In addition to the colour and the type of paint, you should also consider the quality of the paint that you use as paint qualities can vary greatly. Some painters will recommend a specific brand that they know to be of high quality because this can affect their warranty.

Interior painting can be a great way to spruce up any room – just make sure you take the time to choose the right paint so that you will end up with results that you love.